Excel LAR Formatting Tool
Excel LAR Formatting Tool: https://ffiec.cfpb.gov/tools/lar-formatting
Instructions for using the LAR Formatting Tool (LARFT) to create a HMDA LAR file.
-
Download the HMDA LAR Formatting Tool for data collected in or after 2018 by selecting the link located on the Loan/Application Register (LAR) Formatting Tool webpage located at https://ffiec.cfpb.gov/tools/lar-formatting.
-
Open the HMDA LAR Formatting Tool you downloaded; If you are using Microsoft Excel 2002 or 2003, please refer to the instructions at the end of this page on how to enable macros.
-
If the message “This file originated from an Internet location and might be unsafe” appears, select the “Enable Editing” button.

-
If the message “Macros have been disabled” appears, select the “Enable Content” button.

-
The workbook contains two worksheets, Resources and Data:
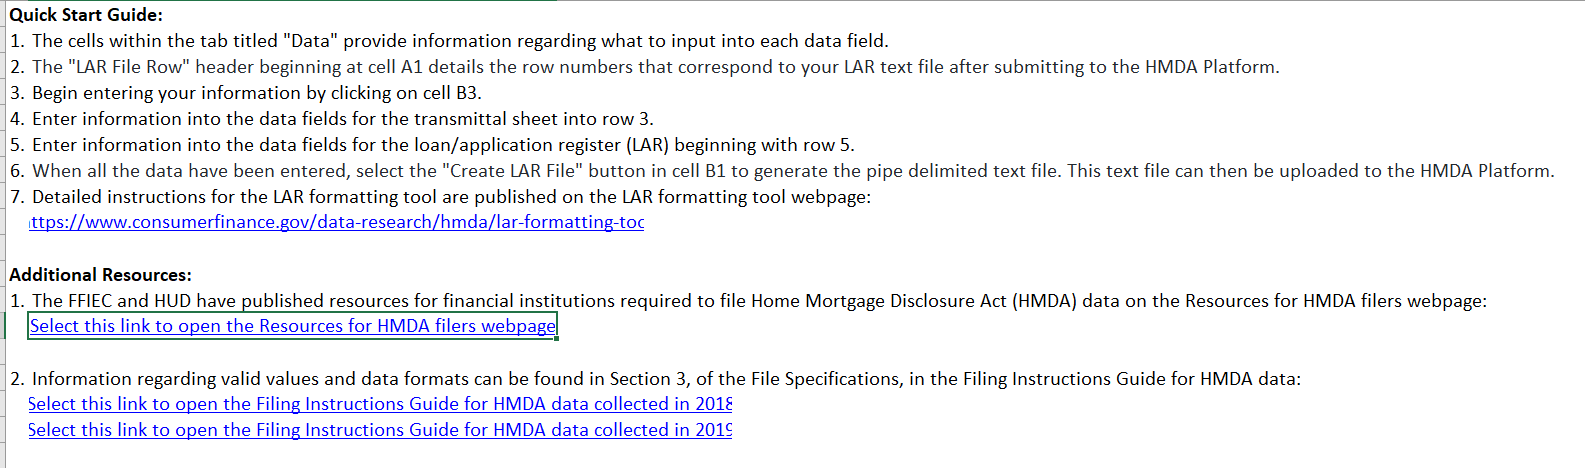
a. The Resources Worksheet provides information including:
- Quick Start Guide
- Additional Resources
- The FFIEC and HUD have published resources for financial institutions required to file HMDA data on the Help for Filers section of the HMDA Homepage located at http://www.ffiec.cfpb.gov/.
- Information regarding valid values and data format can be found in Section 3.4 of the Filing Instructions Guide for HMDA data collected in or after 2018 located at https://files.ffiec.cfpb.gov/documentation/2019-hmda-fig.pdf.
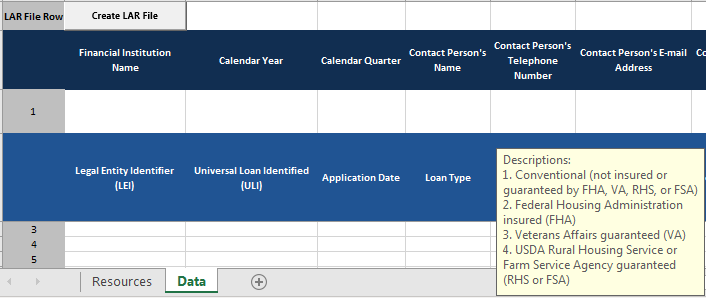
b. The Data Worksheet is where the data is entered under the appropriate headings in row 4.
- Certain cells in the Data Worksheet provide information regarding what data to enter. Prompts will appear when you select a cell.
- The header row (row 2 and row 4) are locked in order to keep the order of the data fields consistent.
-
Enter the information from what is commonly known as the HMDA transmittal sheet into the respective cells in row 3 of the Data Worksheet.
a. The “LAR File Row” header beginning at cell A1 details the row numbers that correspond to your LAR text file after submitting to the HMDA Platform.
b. Do not enter any commas “,” into any of the cells.
c. All of the transmittal sheet information entered into row 3, from cell B3 to O3 will be exported into a pipe delimited text file. Any information entered in row 3 after O3 will not be exported.
d. The data fields have been formatted to wrap text in the cells, which means that the data in each cell wraps to fit the column width. All the data entered into each individual cell will be exported, even if part of the data is not visible.
-
Enter loan level data beginning in row 5 of the Data Worksheet.
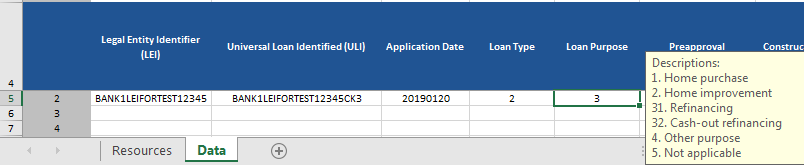
a. Enter the data consecutively by row. Do not skip any rows.
b. Each row should contain information regarding an individual loan.
c. Do not enter any commas “,” into any of the cells.
d. The format for data fields including a date, such as date application received or date of action, is YYYYMMDD. For example, January 17, 2019 should be reported as 20190117.
e. Not applicable exempt codes must be entered as ‘NA’, not ‘N/A’, ‘na’, or ‘Na’. Exempt codes must be entered as ‘Exempt’, not ‘EXEMPT’ or ‘exempt’.
f. Beginning with row 5, all data entered from columns A to DF will be exported into the pipe delimited text file. Any information entered after column DF will not be exported.
g. The data fields have been formatted to wrap text in the cells, which means that the data in each cell wraps to fit the column width. All the data entered into each individual cell will be exported, even if part of the data is not visible.
-
When all the data have been entered, select the “Create LAR File” button located in cell B1 of the Data Worksheet.

-
Enter a new filename and save the file type as “Text Files” in the prompt to save the new file.
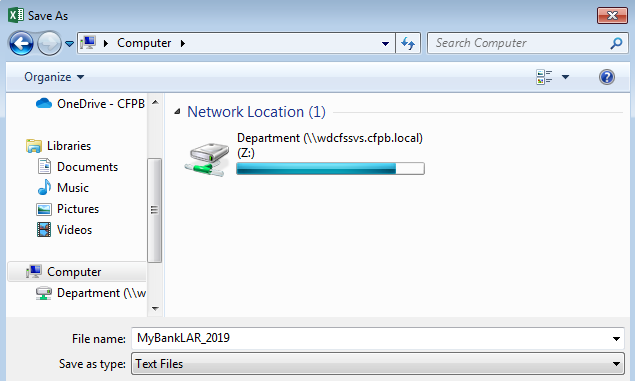
-
Select “Save” in the message confirming whether the changes to the file should be saved.
a. This will save the data into a separate pipe delimited text file.
-
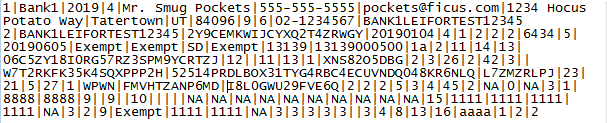
The data is now formatted into a pipe delimited text file (as shown below) and ready to be submitted to the HMDA Platform. Prior to submission, the file format can be verified by the File Format Verification Tool.
NOTE: The HMDA LAR Formatting Tool workbook in which the data was originally entered will not be used during the filing process. This workbook can be saved for your reference.
To save the data entered in the workbook for future reference:
-
Within the HMDA_LAR_Formatting_Tool workbook, select “File”.
-
Select “Save As”.
-
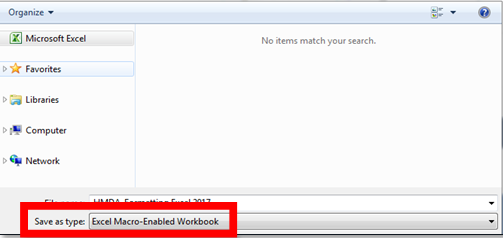
Enter a new filename and save the file type as “Excel Macro-Enabled Workbook” in the prompt to save the file.
-
Select “OK” in the privacy warning.

Frequently Asked Questions
The Frequently Asked Questions are available at https://ffiec.cfpb.gov/documentation/category/frequently-asked-questions
HMDA Help
Technical questions about reporting HMDA data collected in or after 2017 should be directed to hmdahelp@cfpb.gov.
Enabling macros for Microsoft Excel 2002 and 2003
If the message “The macro may not be available in this workbook or all macros may be disabled” appears, then the macro settings must be updated.
To enable the HMDA LAR Formatting Tool macro:
-
Open the HMDA_LAR_Formatting_Tool workbook.
-
Select Tools.
-
Select Options.
-
Within the Options dialog box, select the Security tab.
-
Select Macro Security.
-
In the Security dialog box, select the Medium option.
a. This will allow you to choose which macros to run.
-
Select OK to close the Security dialog box.
-
Select OK to close the Options dialog box.
-
Return to step 4 in the instructions for the HMDA LAR Formatting Tool.
Transferring existing data from another workbook or Google Sheets web-based spreadsheet program
Data that is saved in another workbook or in Google Sheets™ web-based spreadsheet program may be copied into the LAR Formatting Tool so that the data can be formatted into a pipe delimited text file. To copy data from external sources into the HMDA LAR Formatting Tool:
-
Open the workbook or the Google Sheets™ web-based spreadsheet program where the data is stored.
-
Confirm that the data fields are displayed in the same order as required in Section 3.4, File Specifications, of the applicable Filing Instructions Guide.
-
Open the HMDA_LAR_Formatting_Tool workbook.
-
Copy and paste the information from the transmittal sheet into row 3 of the Data Worksheet.
- To preserve the format of the data, please use “Paste > Paste Special > Paste Values” or “Paste > Paste Special > Text.”
- The pasted data fields should align with the headers displayed in row 2.
- Copy and paste the information from the LAR into the Data Worksheet beginning in row 5.
- To preserve the format of the data, please use “Paste > Paste Special > Paste Values” or “Paste > Paste Special > Text.”
- The pasted data fields should align with the headers in row 4.